DIY Garden automation intro
In our previous post we showed what where the steps during the process of making our DIY garden automation controller. If you have not read them we highly recommend to read those entries. But back to track: in this entry finally all the components got connected and the first tests where conducted.
Investigation
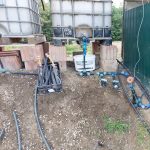
We encountered several bumps just when we thought there is no more surprise will arise. First it turned out there the desired place of the water tanks are lower then the surface we would like to irrigate. So as you can see we have to move 2m3 dirt to have the right surface at the right place.
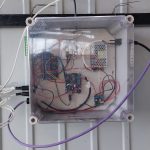
The final most ‘unwanted’ issue turned out to be the connection issue. The 2.4Ghz signal was not reaching our main Wifi router. Let’s solve this issue 🙂
The final most ‘unwanted’ issue turned out to be the connection issue. The 2.4Ghz signal was not reaching our main Wifi router. Let’s solve this issue 🙂
Solution
So the connection issue. We tried several approach but nothing helped… After a few devastated minutes we realized that in our shelf we have a Wifi antenna which was brought to a different project but it has not been used. Let’s use it. Of course the male/female SMA connectors were not matching 🙁 Pfff … this is not good. Then again! We had some smd to SMA connectors in some of our boxes. We had luck and find one which made the connection possible. With the usage of a laser pointer we managed to mount the antenna correctly and we had signal!
DIY Garden automation tests results and future improvements
This is the lists where we have room for improvements:
- The water level sensor can get ‘clogged up’ which results in incorrect readings. this is caused by the scale and the algae
- It is highly recommended a physical water level detector just like with the submerged pumps because that’s more reliable
- electricity goes through water obviously but it means that one of your cheap can generate unwanted-faulty ground connection [flow sensor]
- Do not be afraid to use Google